Disclosure: Hypertrophy Protocol participates in the Bulletproof Fitness Equipment affiliate program and may earn a commission from qualifying purchases made through links on this page.
Updated October 9, 2026. Bulletproof specs and included parts are from manufacturer pages, checked October 2026.
You already own a power rack, and you want cable flyes, crossovers and lateral raises without parking a dual-stack machine next to it. A Bulletproof VTS pair can get you there, but only with one Left and one Right High/Low Pulley System added, because the VTS is a trolley system with no cable of its own. Built that way, your rack becomes a dual functional trainer with two independent cable columns, though it won’t match a selectorized machine’s quick pin changes or light starting weight.
I run two VTS sets on two different racks, with a Stump bar, the Launch Pad and 360 Bearing Handles, plus an Isolator with ISO Arms on one of them. I don’t own a High/Low on either rack, so the High/Low parts and specs below come from Bulletproof’s pages, and the parts table labels which entries are manufacturer specs and which describe my racks.
Why can’t a VTS pair give you cables on its own?
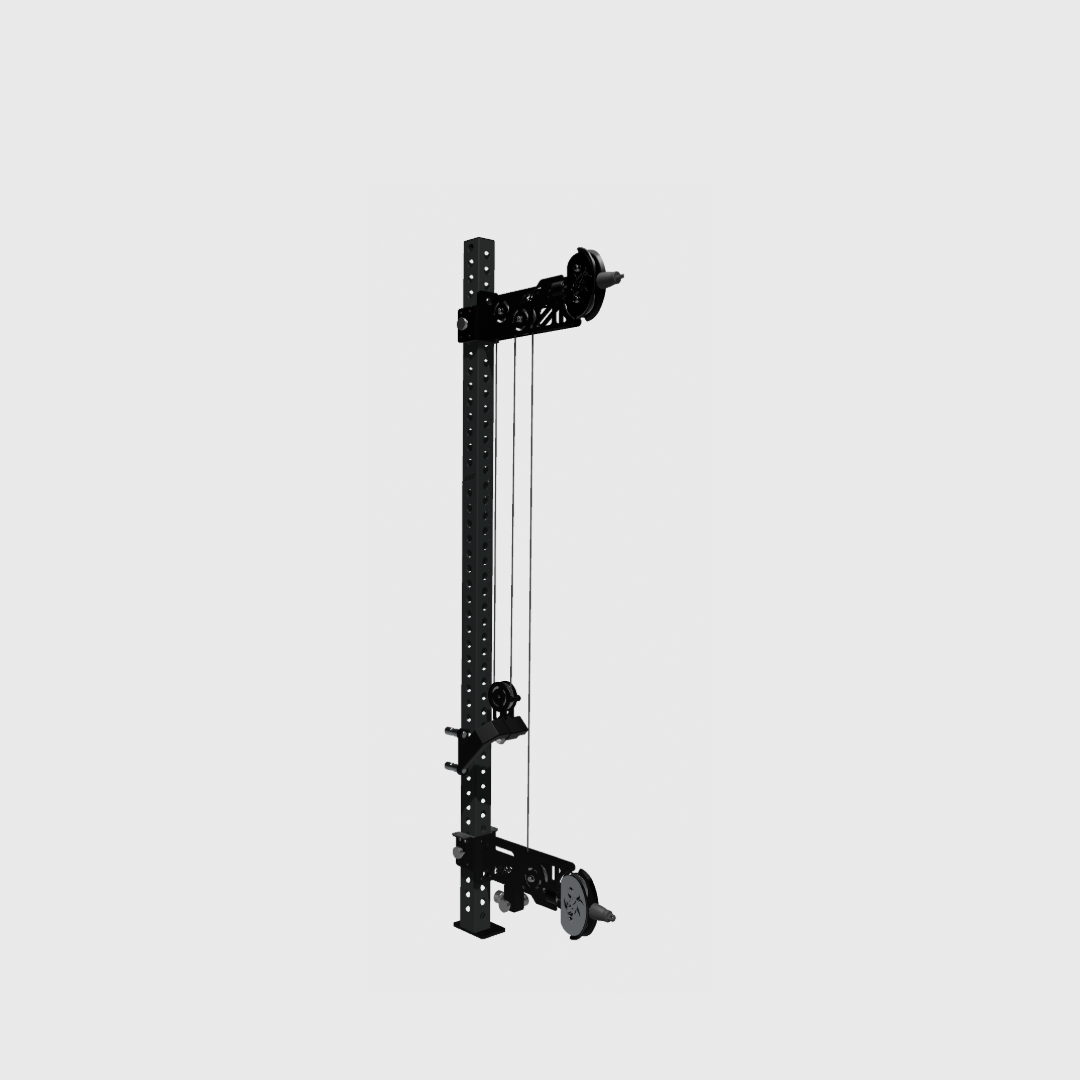
Start with the job each part does, because the product names make it easy to order the wrong half. A VTS pair is two trolleys, one per upright, that ride up and down carrying a bar, handles or plates. It guides load. It has no pulley and no cable, so by itself it gives you Smith-style training and none of the cable work a functional trainer exists for.
The High/Low Pulley System is the cable half. It’s sold one side at a time, Left or Right, and each unit turns one trolley into one cable column. So the build takes one VTS pair and two High/Low units. You don’t need a second VTS pair, because one pair already gives you a left trolley and a right trolley. For how both fit the rest of the lineup, see the Bulletproof Fitness Equipment Ecosystem Guide.
The trolley tier matters too. Full VTS and VTS Lite both have the hex ports the High/Low connects through. VTS Lite HOME does not, and “Hex ports for Hi-Lo cable system” appears on its product page under what isn’t included. Don’t confuse it with the separate VTS HOME Non-BYOB, which appears on the High/Low page as a compatible product. If you’re still choosing a tier, VTS vs VTS Lite vs VTS Lite HOME walks through it.
Which parts go on the left and right side?
With one pair and two pulleys settled, here is the full build for each column. The Source column marks which entries are Bulletproof specs and which describe my own racks.
| Part | Left column | Right column | Source |
|---|---|---|---|
| Rack upright | Left 3×3 upright, rack anchored | Right 3×3 upright, rack anchored | Bulletproof spec |
| Trolley | Left trolley of a VTS or VTS Lite pair | Right trolley of the same pair | Bulletproof spec |
| Cable unit | High/Low Pulley System, Left | High/Low Pulley System, Right | Bulletproof spec |
| In each High/Low box | The pulley unit (Left or Right), plus 1x cable, 1x cable fittings, 1x cable installation tools, 1x Middle Pulley Hex Adapter (for VTS/VTS Lite), 1x Weight Horns (for VTS/VTS Lite) | Bulletproof “What’s included” | |
| Cable handles | Not on the included list; buy or reuse a pair | Bulletproof spec (absent from list) | |
| Projection, per unit | Rear 1.02 in; front up to 25.16 in; side up to 6.38 in | Bulletproof spec | |
| My VTS attachments | VTS on two separate racks; Stump bar, Launch Pad, 360 Bearing Handles | My build | |
Two lines in that table change your order. The weight horns and hex adapter ship with each High/Low, so you don’t buy them separately for this build. Handles aren’t listed, so plan on a pair of cable handles; the 360 Bearing Handles I use on my VTS mount on telescopic tubes, and their page says nothing about clipping them to a cable. Cable Attachments for Hypertrophy can help you pick the handles.
High/Low Pulley System product page · VTS product page
How does the cable get from the plates to your hand?
The parts list tells you what to buy. The cable path tells you what you’ll feel at the handle. Judging from the included parts, plates go on the weight horns, the horns sit on the trolley, and the trolley rides the upright. The Middle Pulley Hex Adapter then appears to join that trolley to the cable, which runs through the High/Low and out its dual swiveling front pulleys to your handle.
The product page doesn’t describe the routing in text, so treat that layout as a reading of the parts list and check Bulletproof’s installation video for the actual path. Two modes are on the spec list. In 1:1 you get full resistance and the trolley travels as far as the handle. In 2:1 two cable strands share the load, so your hand needs about half the force and moves twice as far as the trolley.
| Mode | Force at handle (ideal) | Trolley travel per 20 in of handle travel | Lightest load, full VTS trolley (24 lb) | Lightest load, VTS Lite trolley (15 lb) |
|---|---|---|---|---|
| 1:1 | Full load | 20 in | 24 lb, plus horns and adapter | 15 lb, plus horns and adapter |
| 2:1 | Half the load | 10 in | 12 lb, plus half the horn and adapter weight | 7.5 lb, plus half the horn and adapter weight |
Ideal-pulley math, checked with Wolfram|Alpha. Trolley weights are Bulletproof’s listed figures. Horn and adapter weights aren’t published, so they’re left as unknowns, and real friction adds resistance on the lifting phase.
The last two columns matter if you’re weighing this against a stack. Even in 2:1, the trolley’s own mass sets a floor before you add a plate. That floor is fine for most rows and presses but can be heavy for strict lateral raises and rear-delt work. Run your own loads through the Cable Pulley Ratio Calculator, and see Cable Pulley Ratios Explained: 1:1 vs 2:1 Systems for how friction shifts those numbers.
Travel is the other limit. In 1:1, a long fly needs as much clear upright as handle travel, so check that the trolley won’t hit a crossmember, a safety or another attachment before you settle on a mode for that exercise.
What happens to the jobs your trolleys already do?
That travel check points to the bigger issue on a single rack: the cable build uses the same trolleys you use for everything else. On my racks the VTS trolleys carry the Stump bar, the Launch Pad or the 360 Bearing Handles. A cable column becomes one more job for those trolleys.
On my racks, a bar locked into both hooks ties the two trolleys together, and they work like a traditional Smith machine. That’s what you want for Smith work, but it also means the trolleys can’t move on their own, so clear the bar from the hooks before any cable work.
My gym has two racks, each with its own VTS set. With only one rack, group your cable movements into their own session rather than switching between Smith work and cables set by set.
It also helps to be clear about what the cables add. The 360 Bearing Handles already give you independent-handle presses and rows on the VTS, and the ISO Arms on my Isolator cover lever-arm pressing and rowing. Neither lets you set a cable angle, so the High/Low earns its place for crossovers, flyes, lateral raises and face pulls. The Bulletproof Handle Compatibility Guide shows which handles fit which interface.
Will two High/Low units fit your rack and your wall?
Once you know the build is worth it, check the space. Treat 3×3 uprights as the documented fit. The High/Low page’s short description mentions 3×3 or 2×3, but its compatibility section lists only compatible 3×3 uprights, so confirm with Bulletproof before ordering for a 2×3 rack. The power rack buying guide covers upright and hole specs if you’re still choosing a rack. On the trolley side, VTS and VTS Lite are tested to a 43 in inside rack width with a 7 ft Olympic bar.
The projections in the parts table decide placement. Rear projection is tiny, so a rack close to a wall isn’t ruled out by the pulley itself; my uprights sit 17 in from the wall. That same gap already limits rear-facing weight horns for plate loading on my rack, so check which way the included horns face on yours before you count on loading full-size plates.
The front projection is standing room you lose when the pulleys are in use, so measure the floor in front of both uprights. Then anchor the rack. Bulletproof’s VTS page warns that racks “have the propensity to tip based on weight and angle of pull,” and a heavy cross-body or low-row cable pull is exactly that kind of angled load.
When is a dual-stack functional trainer still the better buy?
Fit and anchoring decide whether the build is possible. Whether it’s the right buy depends on how you train. A selectorized dual stack changes weight with a pin, and it stays ready while someone else is using the rack. If several people share your gym, or you superset cables with barbell work, that convenience is hard to give up.
There is a middle path if you want the cables without tying up your VTS. Bulletproof’s Double Weight Horn Trolley Front Facing Pulley is on the High/Low’s works-with list, so a separate trolley could carry the cable load while the VTS stays set up for Smith work. That trolley’s page describes clipping straight into the pulley bolt for a “pure 1:1 connection” but gives no ratio for routing through its pulley, so don’t assume one.
So should you build it or buy a dual stack?
If you already own a 3×3 rack with full VTS or VTS Lite, add a Left and a Right High/Low plus a pair of cable handles; it’s the smallest step to a two-column cable station. If you’re buying trolleys now and want cables later, skip VTS Lite HOME.
If your trolleys already carry a bar, a Launch Pad or handles most sessions, plan dedicated cable days or a separate load source before you buy. If quick weight changes or very light lateral raises matter most, a dedicated dual-stack functional trainer is the better fit.
Before you order either High/Low unit, run your rack through the Bulletproof Rack Compatibility Builder.