
Updated October 9, 2026. Rack specs come from manufacturer pages, checked October 2026. Tube stiffness figures are calculated, with the assumptions listed under the table.
You want a power rack for building muscle at home, and every listing leads with steel gauge and a weight rating. Those are rarely the specs that decide whether the rack still works for you years from now. Check upright size and hole pattern first, because they decide which cable, lever and belt squat attachments will fit.
Then check height against your ceiling, then depth, footprint and wall space, then the safeties you’ll set for every hard set. This power rack buying guide works through each one using my own rack, a Rogue Froning RML-4100C Monster Lite, and corrects a tube-stiffness claim an earlier version of this page got wrong.
Which power rack spec should you check first?
Start with the uprights, because almost everything that turns a rack into a hypertrophy station bolts to them. Cable towers, lever arms, belt squat stations and dip arms only fit if the tube size and hole diameter match what the attachment’s maker builds for. No amount of extra steel thickness fixes a mismatch there.
Here is the full spec sheet for my rack, so you can see what each number on a listing looks like in practice.
| Rogue Froning RML-4100C | Listed spec |
|---|---|
| Uprights | 3×3″, 11-gauge steel |
| Hardware | 5/8″ bolts |
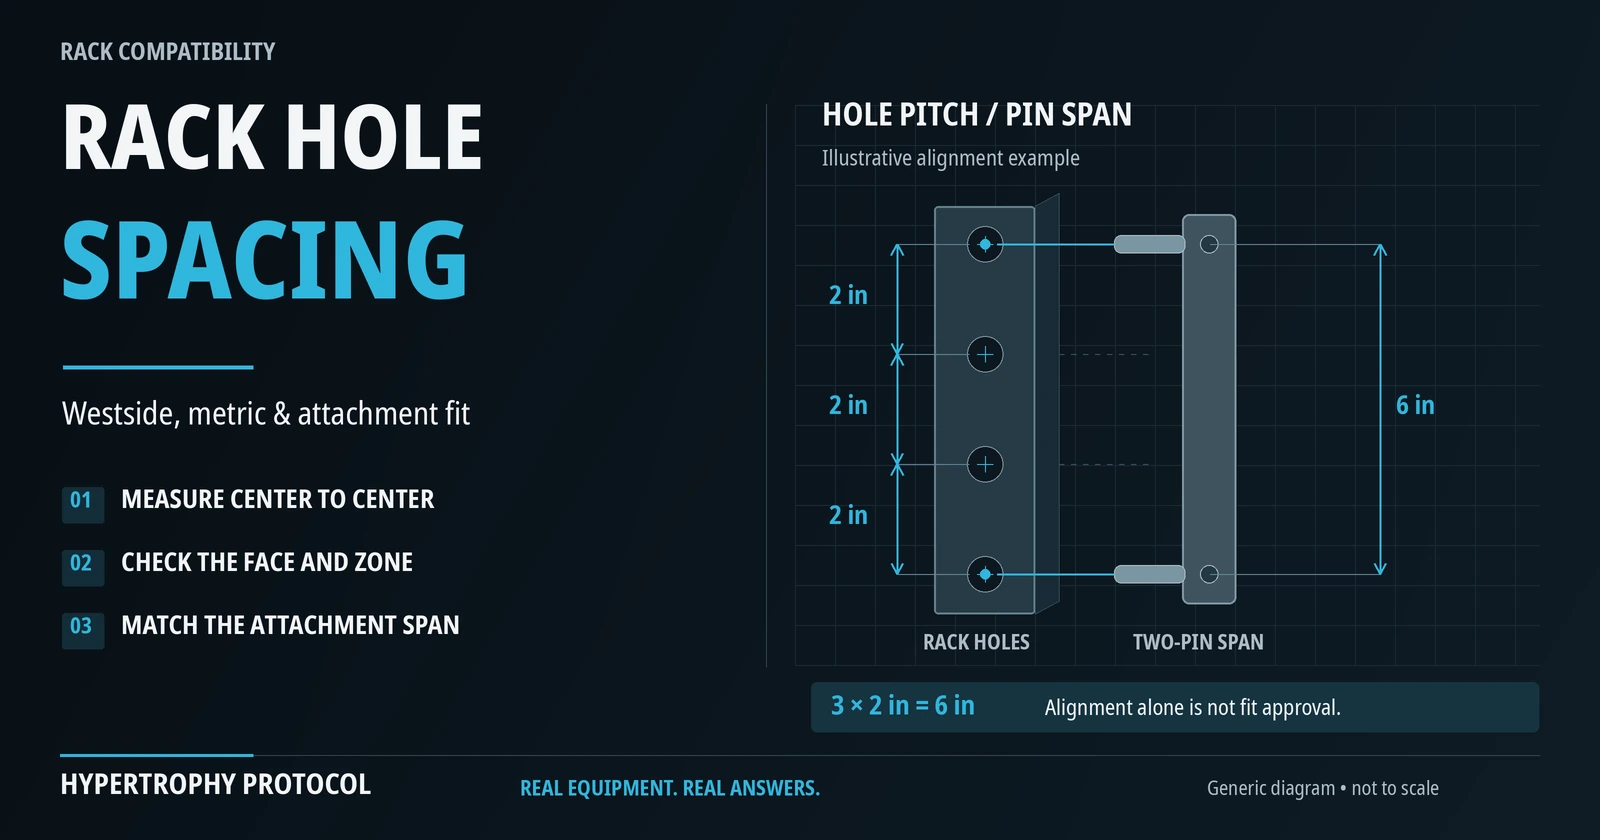
| Hole spacing | 1″ through the bench and pull zone, 2″ above and below (Westside) |
| Height | 100.375″ |
| Footprint | 53″ x 53″ (the same page also lists 49″ overall length and width) |
| Safeties included | 43″ strap safety system |
| Weight capacity | Not stated |
| Anchoring | Bolt to the floor, or add the optional stabilizer |
Source: Rogue’s RML-4100C product page, checked October 9, 2026.
3×3 is the tube size most attachments are built around, but 3×3 racks split between 5/8″ and 1″ hardware, and a 1″ pin won’t pass through a 5/8″ hole. Some racks sold as 3×3 also use metric 75 mm tube, 1.2 mm smaller per face than a true 3×3. Power rack upright sizes explained lists tube, hole and spacing by brand, and 5/8″ vs 1″ rack hardware covers the two hole standards.
Plan for more than one attachment, because they compete for the same uprights. I run two Bulletproof VTS sets, each mounted on a different rack. Before that I owned a Bells of Steel Smith Machine Rack Attachment. It was smooth to use, but it was heavy, needed two people to install, was frustrating to line up and took two full uprights. Uprights that are spoken for can’t hold anything else, so sketch which attachment goes where before you choose the rack.
If you already have attachments in mind, run your candidate rack through the Rack Attachment Fit Checker, which sorts attachments from Rogue, REP, Titan, Bells of Steel and Bulletproof by how well they match your rack. For Bulletproof gear, the Bulletproof compatibility checker goes into more detail.
Does steel gauge matter more than tube size?
With the tube size settled, gauge is the next spec listings push, and this is where the old version of this page made its mistake. It said thinner walls cut a tube’s resistance to bending by more than the thickness difference suggests. For thin-walled tube the reverse is true: bending stiffness falls roughly in step with wall thickness, slightly less. The tube’s outside dimensions matter far more.
The property that measures this is the second moment of area, often called the moment of inertia (I). For the same steel, load and span, a tube with twice the I bends half as much. The table below gives I for common rack tubes, calculated with the standard hollow-rectangle formula, (BH³ − bh³)/12 with B and H as the outside width and depth and b and h as the inside ones, with every result checked in Wolfram|Alpha.
| Upright tube | Wall | I (in⁴) | Stiffness vs 3×3 11-gauge |
|---|---|---|---|
| 3×3″, 11-gauge | 0.120″ | 1.91 | 100% |
| 3×3″, 12-gauge | 0.105″ | 1.70 | 89% |
| 3×3″, 14-gauge | 0.075″ | 1.25 | 65% |
| 2×3″, 11-gauge, bending in its 3″ direction | 0.120″ | 1.42 | 74% |
| 2×3″, 11-gauge, bending in its 2″ direction | 0.120″ | 0.75 | 39% |
| 2×2″, 14-gauge | 0.075″ | 0.36 | 19% |
Assumptions: nominal outside sizes and sharp corners. Real tubes have rounded corners, which lowers every value slightly. Wall thickness follows the Manufacturers’ Standard Gauge for sheet steel (11 ga 0.1196″, 12 ga 0.1046″, 14 ga 0.0747″, per this gauge table), rounded. These are properties of a single tube, not measurements of a whole rack.
Two results stand out. Dropping from 11-gauge to 14-gauge thins the wall by 37.5% and costs about 35% of the stiffness, so the 11-gauge tube is roughly 1.5 times stiffer. A 2×3 tube with the same 11-gauge wall loses 61% when it bends in its narrow direction, so tube shape moves stiffness more than a gauge step does. The 2×2 14-gauge tube on many entry-level racks sits in a different class entirely.
Keep the limits of this table in view. A whole rack’s stiffness also depends on its bolted joints, its crossmembers and whether it’s anchored, and none of that shows up here. No study has linked rack stiffness to muscle growth either. The practical case for 3×3 11-gauge is that it flexes less under heavy sets and fits the most attachments, so you’re less likely to outgrow it. Why 3×3 racks became the standard and 11-gauge vs 14-gauge steel go further into each.
Which safeties let you train close to failure alone?

A stiff, compatible frame matters because of what you do inside it, and for muscle growth that means taking sets close to failure. In a 2024 series of exploratory meta-regressions, muscle size increased as sets ended closer to failure, while strength gains stayed similar across the range (Robinson et al., 2024). The authors estimated reps in reserve from study descriptions, so trust the direction more than any exact figure.
You don’t need to grind every set to a missed rep. A 2023 meta-analysis of 15 studies found only a trivial growth edge for training to failure over stopping short (effect size 0.19, 95% CI 0.00 to 0.37) and no clear edge for momentary failure specifically (Refalo et al., 2023). In an 8-week study of 18 trained lifters, quad growth was similar whether leg press and leg extension sets went to failure or stopped 1 to 2 reps short (Refalo et al., 2024).
Within a rep or two of failure is still where a squat or bench rep can stall, and when you train alone, the safeties are your spotter. That makes hole spacing a safety spec as much as a convenience. You want the safeties just below the bottom of each lift, and that height differs between a squat and a bench press. Westside spacing gives you twice as many settings through the bench zone as 2″ spacing, so you’re less likely to choose between too high and too low.
Rogue ships this rack with strap safeties. Whatever type you choose, confirm that the safeties span the rack’s inside width and can be set for both your squat and your bench without moving the bench outside the rack.
Weight capacity is a weak filter here. Rogue doesn’t state one for my rack, so a missing number isn’t a warning sign at this tier. Where a maker does publish a rating, check whether it covers the safeties or only the J-cups and frame, and buy with a clear margin over what you lift.
Will a tall rack fit under your ceiling?
Once the safeties are sorted, check height, because it decides whether the rack fits in the room at all and you can’t fix it after delivery. Heights vary widely: my Monster Lite uprights are the 100.375″ ones in the table, and I also own 90″ and 84″ uprights.
Under a standard 8 ft (96″) ceiling, 100″ uprights don’t fit at all. A 90″ rack leaves 6″ above the frame and an 84″ rack leaves 12″. Under a 9 ft (108″) ceiling, my uprights leave about 7.6″.
Those gaps are smaller than they look. At the top of a pull-up your head rises above the bar, and the bar sits at or near the top of the frame. Overhead pressing inside the rack also needs room for the bar at lockout.
Measure to the lowest thing overhead, whether that’s a light, a joist, a sprinkler head or a garage door track. Then hang from any bar and pull up to see how much headroom you use. If the numbers don’t work, a shorter rack with pull-ups done elsewhere beats a tall rack you can’t train in.
How much floor and wall space does a rack really take?
A rack that clears the ceiling can still crowd the room, and floor space is where listings are easiest to misread. My rack’s page gives two different sets of base dimensions, as the table shows. Plan around the larger figure until you’ve confirmed which one describes the base, and compare inside width and depth across rack lines in the Power Rack Comparison Tool.
Inside depth decides how much room you have to walk out a squat and where a bench sits for pressing. Attachments then push the footprint past the frame. My old Titan SquatMax-MD, a rack-mounted belt squat, is the clearest example. Loading and unloading plates on its low pin was hard even with a loading add-on, but the floor space it took was the dealbreaker.
Wall clearance is the measurement people skip. My uprights sit 17″ from the wall, which limits rear-facing weight horns for plate storage. Every inch of horn pointing back eats into that gap, and you still need room behind the horn’s tip to line a plate up and slide it on.
If your rack will sit near a wall, plan plate storage on the sides or on a separate tree. Then lay your barbell on the floor where the rack will go and stand at each end as if loading a plate, so you know the side clearance works too.
Which rack specs should you prioritize for your gym?
The order of checks follows what you can and can’t change once the rack arrives. Here is how that plays out for different buyers:
- If you plan to add cable, lever or belt squat attachments, choose the tube and hardware first: 3×3, with whichever hole size (5/8″ or 1″) the attachments you want are built for.
- If your ceiling is 8 ft, shortlist racks around 90″ or shorter and test your pull-up headroom before you order.
- If the rack will sit against a garage wall, measure the wall gap and plan plate storage before you compare gauge.
- If you’re choosing between 11-gauge and 14-gauge in the same tube size, take the 11-gauge if the price gap is small, by the margin in the stiffness table. Treat a 2×2 14-gauge rack as a budget or light-use choice.
- If you train alone and push sets hard, favor Westside spacing and safeties you can set for both squat and bench inside the rack.
Once you have a candidate rack, put it into the Rack Attachment Fit Checker with the attachments you want, and buy the rack that passes.