

Short answer: hole spacing does two jobs. It sets how finely you can adjust J-cups and safeties, and it decides whether an attachment with two or more pins can line up with your holes at all. Spacing is always measured center to center, from the middle of one hole to the middle of the next.
Most rack shoppers only check the first job. The second is where attachments go wrong: a bracket can match your tube size and your hole size and still not bolt on, because its pins don’t land on your holes. This guide covers the common patterns, why they exist, and how to measure your own rack before you buy.
At a glance
| Check | Key number | What it means |
|---|---|---|
| How spacing is measured | Center to center | Middle of one hole to the middle of the next. |
| Common patterns | 2 in throughout; Westside 1 in bench zone; metric 25 or 50 mm | Each maker sets its own Westside zone boundaries. |
| Front vs side | Side faces can differ (e.g. 3, 4 or 6 in) | Check the face the attachment mounts to. |
| Two-pin fit | Pin spacing must divide evenly by hole spacing | 6 in pins line up on 1, 2, 3 or 6 in grids, not a 4 in row. |
| Metric vs inch | 50 mm is 0.8 mm short of 2 in per gap | Over 6 in that is 2.4 mm off: ask the maker. |
| Measuring | Over 5 gaps: 254 mm (2 in) vs 250 mm (50 mm) | Measure across several holes, in one zone. |
Lining up hole centers doesn’t mean an attachment is approved or safe on your rack. Maker specs checked October 4 to 5, 2026. Confirm before ordering.
Four Measurements That Get Mixed Up
Spec sheets and product pages use “spacing” loosely. Keep these four apart:
- Hole diameter: the size of the opening a pin passes through, usually 5/8 inch or 1 inch on home racks. Our 5/8 vs 1 inch hardware guide covers this one.
- Rack hole spacing (pitch): the center-to-center distance between neighboring holes on the same face of the upright, in the same zone.
- Attachment pin spacing (mounting span): the center-to-center distance between the pins or bolts on the attachment itself.
- Working-height step: how far the bar or safety surface moves between settings. A J-cup with an offset hook can change this without changing the rack’s holes at all.
A rack with “2-inch spacing” and a spotter arm with “6-inch spacing” are describing two different things: the first is measurement 2, the second is measurement 3. Confusing them is an easy spacing mistake to make, and we made it ourselves in an earlier version of our fit checker.
The Patterns You’ll See
| Pattern | What it means | Example (maker’s own spec) |
|---|---|---|
| 2 inch throughout | One even grid from bottom to top | REP PR-5000 (REP: “2” hole spacing throughout the uprights”) |
| Westside | 1 inch through the bench (and often clean pull) zone, 2 inch above and below | Rogue S-4 Squat Stand 2.0; Titan X-3 Series |
| Different front and side patterns | The side face is drilled on its own grid, sometimes with a different hole size | Body-Solid SPR1000: front 5/8 in on 2 in centers (1 in in the bench zone), sides 7/8 in on 3 in centers. PRx Profile CORE: 2 in front, 4 in sides. Titan X-3: 6 in side holes. |
| Metric | Spacing in millimeters, close to but not the same as inches | Eleiko Prestera: 50 mm (powder coat) or 25 mm (stainless) |
Note what the table doesn’t say: a “6-inch” number on an attachment page is usually that attachment’s own pin spacing, not a rack pattern you need to own. More on that below.
Where Westside Spacing Comes From
The name comes from Westside Barbell. Louie Simmons described the racks there this way: “The power racks at Westside have holes every 2 inches from the bottom to 2 feet up. There are holes every 1 inch from 2 feet up to the height of the bench press supports, then back to 2 inches apart.”
The point is bench setup. Small differences in J-cup height change how far you have to reach to unrack, and how close a safety sits to your chest at the bottom of a press. One-inch steps let you set both closer to ideal. Below and above that zone, 2-inch steps are fine for squats, rack pulls and overhead work. For which racks use the pattern, see the Westside hole spacing guide.
Two cautions. “Westside” is a description, not a drawing standard: each maker sets its own zone boundaries, so check where the 1-inch section starts and stops on your rack. And we haven’t found documentation of who first drilled a rack this way, so we won’t claim one.
Why Every Rack Doesn’t Use the Same Grid
Makers don’t usually explain their choice, so this section separates what they say from what follows from the geometry.
What makers say: Eleiko describes the 25 mm spacing on its stainless Prestera as allowing “more precise height adjustments,” and offers 50 mm on the powder-coated version. That’s the trade in one sentence: finer spacing, finer adjustment.
What the geometry says: tighter spacing means more holes and less steel between them, and it runs into the hole size. A 1-inch pin needs a hole slightly larger than 1 inch, so 1-inch holes on 1-inch centers would overlap. That’s one reason racks with 1-inch holes tend to use 2-inch spacing and get finer adjustment another way, such as offset J-cups. This is simple geometry, not a strength rating: it doesn’t mean tighter-spaced racks are weaker.
Ecosystem: each brand drills its uprights to suit its own attachments. A side face drilled every 6 inches, for example, suits brackets designed around that span. Spacing is part of a rack system, not a free-standing spec.
Front, Side and Bench Zone: the Face Travels With the Number
A single “hole spacing” figure on a spec sheet almost always means the front face. The sides can be completely different:
- Body-Solid SPR1000: front holes are 5/8 inch on 2-inch centers, tightening to 1-inch centers through the bench zone; side holes are 7/8 inch on 3-inch centers. Different spacing and a different hole size.
- PRx Profile CORE: 2-inch front spacing, 4-inch side spacing, 5/8-inch holes.
- Titan X-3: Westside through the bench and clean pull zone, 2 inches above and below, and side holes every 6 inches. Titan lists the holes as 11/16 inch.
Before buying anything that mounts to the side of an upright, check the side pattern, not the front.
Two Pins Don’t Need Neighboring Holes
This is the part that trips people up, including us. Take a spotter arm with two pins 6 inches apart. That doesn’t mean your rack needs holes every 6 inches. It means the rack needs two holes 6 inches apart, and a rack drilled every 2 inches has plenty of those: three 2-inch intervals make 6 inches. Makers list two-pin arms for 2-inch racks for this reason: Bridge BUILT, for example, sells its C-2 Spotter Arms as “BUILT to fit 3×3″ rack uprights with 2″ hole spacing.”
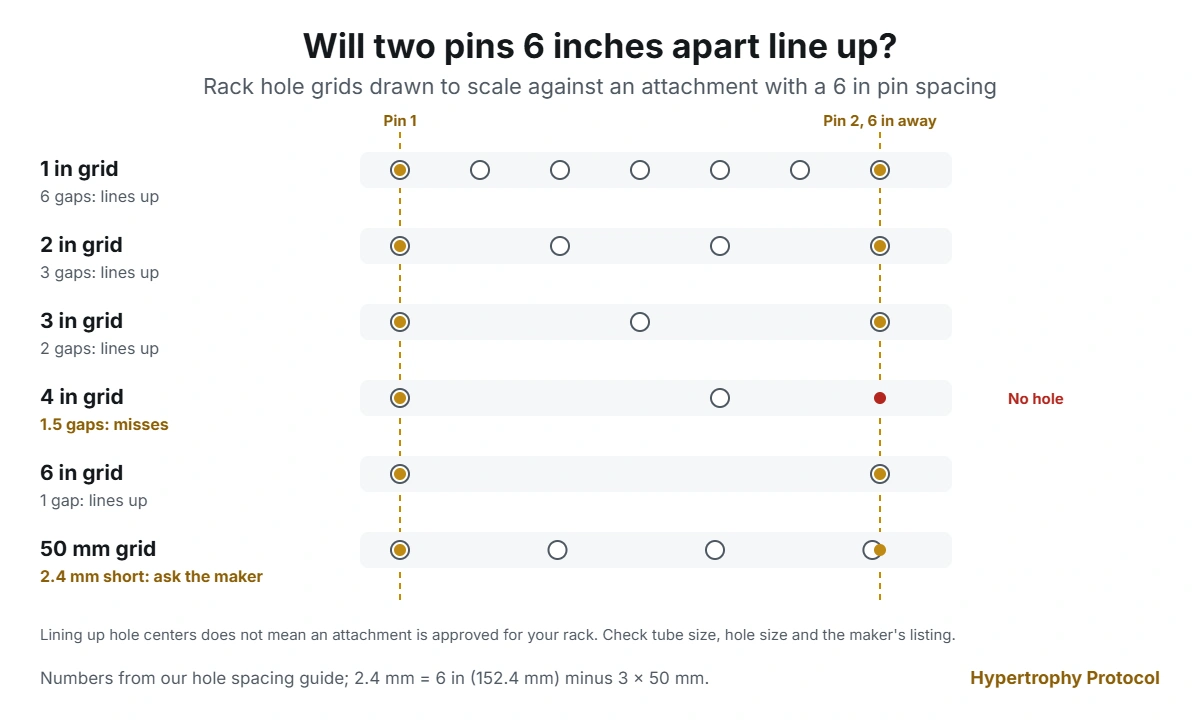
The rule for an even row of holes: two pins line up when the pin spacing divides evenly by the rack’s hole spacing. For a 6-inch pin spacing:
| Rack hole spacing | Intervals in 6 inches | Can both pins line up? |
|---|---|---|
| 1 inch | 6 | Yes |
| 2 inch | 3 | Yes |
| 3 inch | 2 | Yes |
| 4 inch | 1.5 | No, not on a single even row |
| 6 inch | 1 | Yes |
| 50 mm | 3 intervals = 150 mm vs 152.4 mm | 2.4 mm off: ask the maker |
Three limits on this rule. It only tells you whether the hole centers line up, not whether the attachment is approved or safe on your rack. If the pins span a zone change (say, from Westside 1-inch into 2-inch), measure the actual holes instead of dividing. And if an attachment has three or more pins, every one of them has to land, not just the end pins.
Metric Is Close, Not Identical
Inches are defined as exactly 25.4 mm, so metric spacing never quite matches:
- 25 mm vs 1 inch (25.4 mm): 0.4 mm short per gap
- 50 mm vs 2 inches (50.8 mm): 0.8 mm short per gap
- 75 mm vs 3 inches (76.2 mm): 1.2 mm short, which matters for “3×3” tubing too
The difference adds up across holes. Over a 6-inch pin spacing, a 50 mm grid is 2.4 mm off. Some attachments are designed to absorb that with slotted holes or clearance; others aren’t. Treat metric and inch spacing as different patterns unless the attachment maker says it works with both.
Lowered J-Cups Don’t Add Holes
REP’s PR-5000 has 2-inch spacing throughout. REP gets 1-inch bar positions out of it with Lowered J-Cups 2.0, which hold the bar an inch lower than standard cups in the same hole. In REP’s words: “If you want 1″ hole spacing throughout the entire rack, you need both Lowered J-cups 2.0 and Standard J-cups.”
That gives you 1-inch steps for the bar, which is what matters for bench setup. It doesn’t change the rack itself: the holes are still 2 inches apart, so spotter arms, safeties and any other attachment still mount on the 2-inch grid. (REP’s PR-4000, by contrast, has true 1-inch spacing through the bench zone.)
Attachments With Special Mounting
- Single-pin attachments (most J-cups, band pegs, many storage hooks) only need one hole, so spacing just sets their height steps.
- Two-pin and multi-bolt attachments (spotter arms, lever arms, dip stations, pulley brackets, rack extensions) need their pins to land, so check their pin spacing against your holes.
- Brackets with several hole options are designed to cover more racks. Bridge BUILT’s Bolt-On Omni-Pulley Bracket 2.0, for example, has 1-inch hole spacing on its endplate “to fit a variety of different racks.”
- System-specific attachments like Smith conversions are built for named rack lines and heights. Spacing being compatible doesn’t make them compatible with other racks.
How to Measure Your Rack
- Pick the face. Decide whether the attachment mounts to the front or the side, and measure that face.
- Stay in one zone. On a Westside rack, measure the 1-inch section and the 2-inch section separately.
- Measure across several holes, not one gap. Measure from the center of one hole to the center of a hole five holes away (or edge to same edge), then divide by the number of gaps. Six holes have five gaps. Measuring over a longer distance shows small differences: over five gaps, 2-inch spacing measures 254 mm, 50 mm spacing measures 250 mm.
- Measure hole diameter separately. Calipers are best. Don’t assume the bolt that holds the rack together matches the attachment holes.
- For two-pin attachments, measure between the two holes you’d actually use, and check both are clear of crossmembers, welds and other attachments.
- Write it down. Mark one hole as zero and note the positions, especially if the pattern changes partway up.
Never drill or enlarge holes in an upright to make an attachment fit.
Which Spacing Should You Look For?
There’s no single best pattern. Pick based on what you’ll actually do:
- If you bench a lot, Westside or another option for 1-inch bar steps (including offset J-cups on a 2-inch rack) makes setup noticeably easier.
- If you plan to add attachments over time, a plain 2-inch grid is the most predictable: it has pairs of holes at every even distance (2, 4, 6, 8 inches), so any attachment whose pin spacing is a multiple of 2 inches can line up.
- If you already know the attachments you want, check their pin spacing against the rack before buying either one.
The Rack Attachment Fit Checker checks tube size and hole size for attachments from the major brands, and for two-pin attachments where we know the pin spacing, it checks that against the racks where we’ve recorded hole spacing. Where we don’t have the numbers, it tells you what to measure. To compare racks side by side, use the Power Rack Comparison Tool.
FAQ
Is Westside spacing necessary?
No. It’s a convenience for bench setup. Offset J-cups on a 2-inch rack give similar bar steps, though the safeties stay on the 2-inch grid.
Is 50 mm the same as 2 inches?
No. 50 mm is 0.8 mm shorter per gap between holes, and the difference adds up across several holes. Check with the maker before mixing metric racks and inch attachments that use two or more pins.
Can an attachment with pins 6 inches apart fit a rack with 2-inch spacing?
The hole centers line up, because 6 is three 2-inch gaps. Whether it fits also depends on tube size, hole size, clearance and the maker’s approval. Check the attachment’s own listing: Bridge BUILT, for example, lists its C-2 Spotter Arms for 3×3 uprights with 2-inch hole spacing.
Does a bigger pin mean less wobble?
Not by itself. Wobble comes from the gap between the pin and the hole, and from how the attachment is built. A pin made for your hole size has less play than an undersized pin in a bigger hole, whatever the size.
Can an adapter fix a spacing mismatch?
Hole adapters change hole diameter, not hole positions. If an attachment’s pins don’t line up with your holes, an adapter won’t move them.
Specs quoted from manufacturer pages checked October 4 to 5, 2026: REP PR-5000 and Lowered J-Cups 2.0, Rogue S-4 Squat Stand 2.0, Titan X-3 Series Flat Foot Power Rack, Body-Solid Pro Clubline SPR1000, PRx Profile CORE, Eleiko Prestera, and Bridge BUILT C-2 Spotter Arms and Bolt-On Omni-Pulley Bracket 2.0. Westside quote from Louie Simmons, “What Your Gym Really Needs,” Westside Barbell. Manufacturers change specs, so confirm on the product page before ordering. Metric differences calculated from the exact 25.4 mm inch and checked with Wolfram|Alpha.
Access the Protocol